Creating a Facebook business page doesn’t have to be rocket science (difficult), what you need is your images (for both your profile and cover photo), text, and some basic ideas.
Then you need to settle down and we would walk you through the simple steps to get your Facebook business page up and running.
Remember that Facebook has over 2.8 billion active monthly users and over 140 million businesses already use Facebook to connect with that massive audience.
So why not join these millions and take advantage of a Facebook business page
How to create a Facebook page for business
Before signing up for your Facebook business page, you need to log into your personal Facebook account.
Be rest assured that the information from your personal account will not reflect on your business page.
So, if you’re not already logged into your personal account, log in now, then dive into the Page creation steps.
Step 1: Sign up
To start your journey of creating your Facebook business page, you need to head to Facebook.com/pages/create to sign up
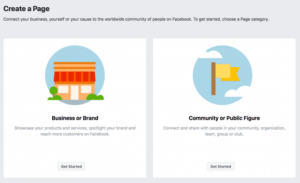
Then select the type of page you want to create, be it business/brand or community/public figure.
For the purpose of this post, we would be creating a business page/brand page, so click the start page button under the business page to get started.

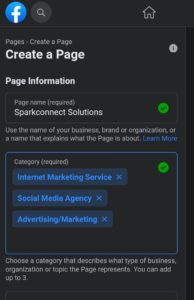
The next thing to do is to enter your business information. For your page name, use your business name or the name people are likely to search for when trying to find your business.
Under category, type a word or two that describes your business and Facebook will suggest some options.

If your business falls into more than one of the category options, choose the one your customers are most likely to think of when they think about your business.
However, Facebook gives you the opportunity to choose three options that represent your business.
Once you choose your category, fill in the description box (write about what your business does, the services you provide, or the purpose of the Page) then click create the page.
The page will expand to ask for a few further details, like your address and phone number.
You can choose whether to make this information public or to show only your city and state.
When you’re ready, click Continue. Note that doing so indicates your acceptance of Facebook’s Pages, Groups and Events Policies, so you might want to check those out before you proceed.
Step 2. Add Images
The next thing is to add a profile and cover images for your Facebook page.
It’s vital that you create a good visual first impression, so choose wisely here.
Make sure the photos you choose to align with your brand and are easily identifiable with your business.
Note that your profile image accompanies your business name in search results and when you interact with users.
If you have a recognizable brand, using your logo is probably a safe way to go.
For a celebrity or public figure, a picture of your face will do just fine. If you are a local business, a well-shot image of your signature offering can do the needful.
The important thing is to help a potential follower or customer to recognize your page immediately.
The standard size of a Facebook profile picture displays at 170 x 170 pixels on a desktop and 128 x 128 pixels on mobile.
Once satisfied with your profile picture, click on the Upload Profile Picture button to upload.
The next thing under this step is to choose your cover image, which is the most prominent image on your Facebook business page.
Your cover image should capture the essence of your brand and convey your brand personality.
The standard size will display at 820 x 312 pixels on desktop or 640 x 360 pixels on mobile.
Once you’ve selected an appropriate image, click the upload your Cover Photo button to upload.
Step 3: Create your username

A Facebook username is very essential to your business because it tells people where to find you on Facebook.
Make sure your username doesn’t exceed 50 characters to make people remember it, make it easy for them to type.
You can make use of your business names like @Sparkconect, @Afrimash, etc.
Click Create Page @Username in the left menu to set up your vanity URL.
Step 4: Add your business details

It’s very important and professional to fill out all of the fields in your Facebook Page’s About section from the start.
A lot of people often go to your social media page to get information about you, so having all your details there is important.
For example, if a potential customer is looking for a business that’s open till 9 pm, and they want to confirm this information on your page. If they can’t find it, they would probably move to your competitors.
To start filling out your business details, click Edit Page Info in the top menu.
From this screen, you can share all the important information about your business
Step 5. Tell your story
Storytelling helps you to tell a story about your brand, product, etc to captivate the attention of your audience.
Stories appeal to our emotions and sense of empathy.
Fortunately, there’s a section of your Facebook business page where you can add a longer description about your business.
Click See more in the left menu, then click About, and then click Our Story on the right-hand side.
In this section, you can add a detailed description of what your business would offer to customers and why they should Like or Follow your Page.
Give them a compelling reason to stick around, how you want to interact with them with your Facebook page.
Make sure you enter a headline and text for your story, then upload a relevant photo.
If you are satisfied with what you have done, you can click the publish button.
Step 6. Create your first post
Posting valuable, informative, and relevant content is a great way to increase your Facebook online presence and establish yourself as an industry thought leader.
Before you start inviting people to like your Facebook page for your business, you should post some valuable content.
These are the things that would attract people to your page if they get to your page and don’t find anything they would probably leave.
Image
7. Add a call to action

This is the 21st century and people don’t really have time to read through all your content, therefore you have to tell them what to do and where to go.
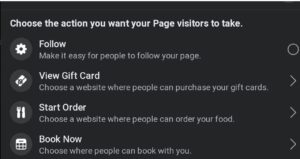
Facebook’s built-in CTA button makes it very easy to give the consumer what they’re looking for, including allowing them to engage with your business in real life.
The right CTA button will encourage visitors to learn more about your business, shop, download your app, or book an appointment and so much more.

